-
-
NOTE: Before adding pages you must configure your file as a multi-page document (see above).
-
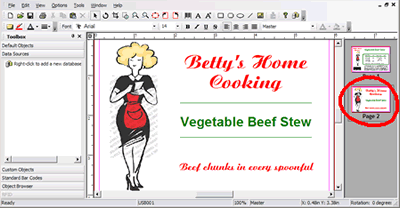
Right click on any page in the right panel of the screen.

-
Select . A new page is added to the end.
-
Multi-page labels are convenient when creating inserts, instructions for use, technical data sheets, manuals or any other multi-page documents.
To configure multi-page documents without the wizard:
Choose . The Label Properties window appears.
Select the Layout tab.
Click the Multi Page radio button.
Enter the width, height, top margin and side margin in their respective boxes.
NOTE: The dimensions of the first page will apply to the pages that follow.
(Optional) Click the button repeatedly until the label orientation appears correctly in the Preview.
Click .
To add pages:
NOTE: Before adding pages you must configure your file as a multi-page document (see above).
Right click on any page in the right panel of the screen.

Select . A new page is added to the end.
To move a page:
Click on any page in the right panel of the screen to move.
Hold down the left mouse button while dragging the page to the desired location before or after another page.
To delete a page:
Right click on any page In the right panel of the screen to delete.
Select
NOTE: Only one page can be deleted at a time. The page deleted is removed and page numbering is automatically updated. For example, if Page 2 is deleted then Page 3 replaces Page 2.
NOTE: To delete a page when there are only two pages, you must change Label Properties from Multi Page to Single Page.
To copy, cut and paste a page:
Right click on any page in the right panel of the screen to copy or cut.
Select or
Right click again, then select .
NOTE: It does not matter where you place your mouse to paste the page. The page copied or cut is always placed at the end of all the pages.
To print multi- page documents:
Choose . The Print window appears.
